02-0: Clone Github Repositories
Clone a repository to your computer
Transcript
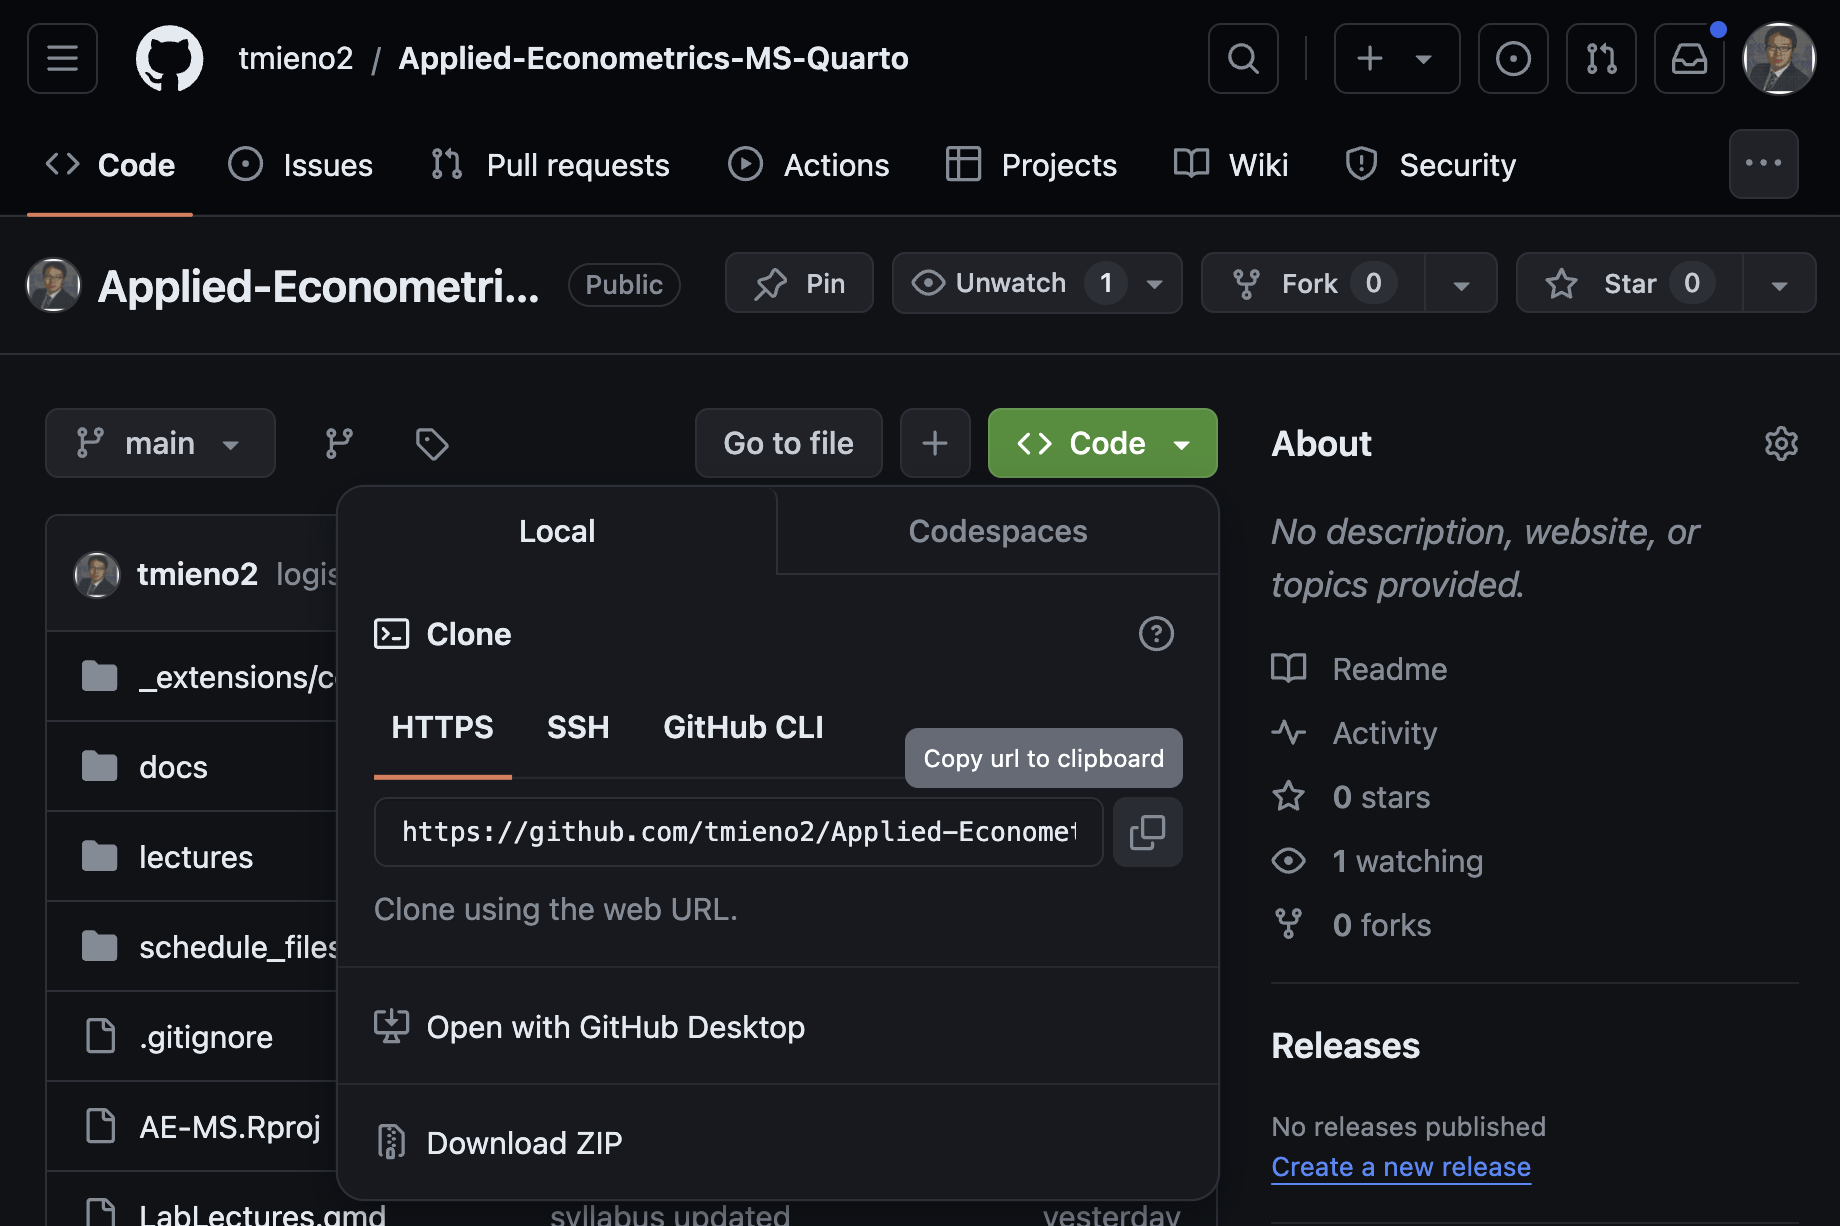
The first half of cloning happens on the Github website, not on your machine. You go to the repository you want, and you look for the green Code button, which is on the main page of every repository. Click it and a small panel drops down with the repository’s address in it. Keep the Local tab and the HTTPS option selected, as they are in the screenshot. SSH and Github CLI are other ways to connect, but they require setup that we do not need for a public repository. Download ZIP gives you an archive instead of the URL that Sublime Merge uses for this workflow. Next to that address is a little icon showing two overlapping sheets of paper, and that is the copy button. Click it and the URL is on your clipboard. That is genuinely all this step is: go and get the address. The screenshot below shows exactly what you are looking for, because the button is smaller than you would expect. Once you have copied it, move to the Clone the repository tab and give that address to Sublime Merge.
- Visit the Github repository you want to clone (copy)
- Click on the green Code button
- Click the copy button, the icon showing two overlapping sheets of paper, which copies the url of the repository
Transcript
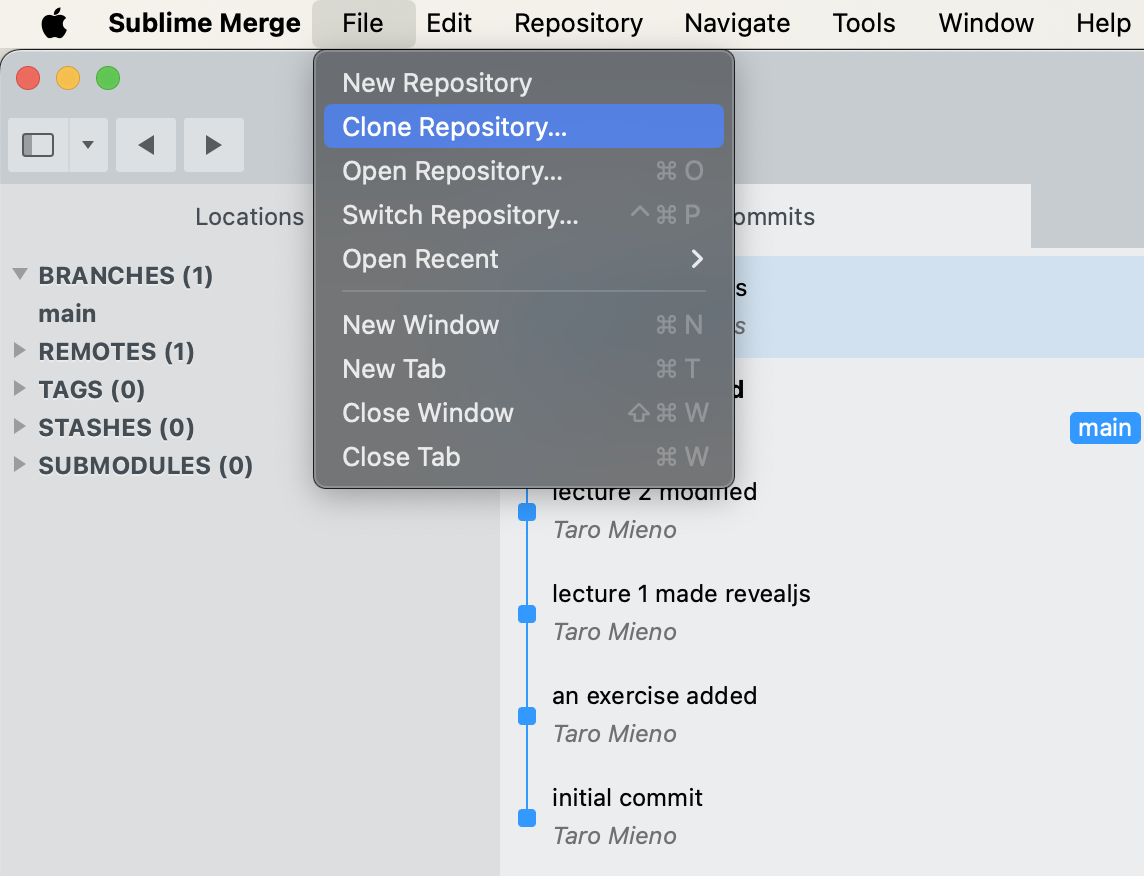
Now the second half, over in Sublime Merge, and it is three short steps in the tabs below. Step one, open the File menu and choose Clone Repository. Step two, you get a dialog with three boxes: the source URL, which should already be filled in from your clipboard, the repository name, and the destination path, which is where the folder will actually land on your machine. If the Source URL box is empty, paste the URL yourself. Sublime Merge also fills in the Repository Name from that URL. You can leave that name alone, or type a different name if you want the new folder on your computer to have a different name. For Destination Path, click the gray button with three dots and choose the parent folder where you want that new repository folder to be created. This is worth choosing carefully because you will need to return to these files in later lectures. Then click Clone to start copying the repository. Step three is the one I added deliberately, because people skip it. Sublime Merge opens the repository when it finishes, which tells you the copy worked but not where it went. Go to the Destination Path in Finder on a Mac or File Explorer on Windows. You should see a new folder with the Repository Name you just accepted or entered. Open it and confirm that the files you saw on Github are inside, so you know both that cloning succeeded and where to find the copy again. If you cannot find the folder, the callout gives you a shortcut: while the repository is open in Sublime Merge, open the command palette and select Open Containing Folder. Sublime Merge can take you directly there because it already knows the local path. Click through the tabs and I will show you each screen. After you have checked the result, the Do it yourself tab gives you the course repository to clone with this same workflow.
Go to Sublime Merge and follow file -> Clone Repository
You should now see something like below.
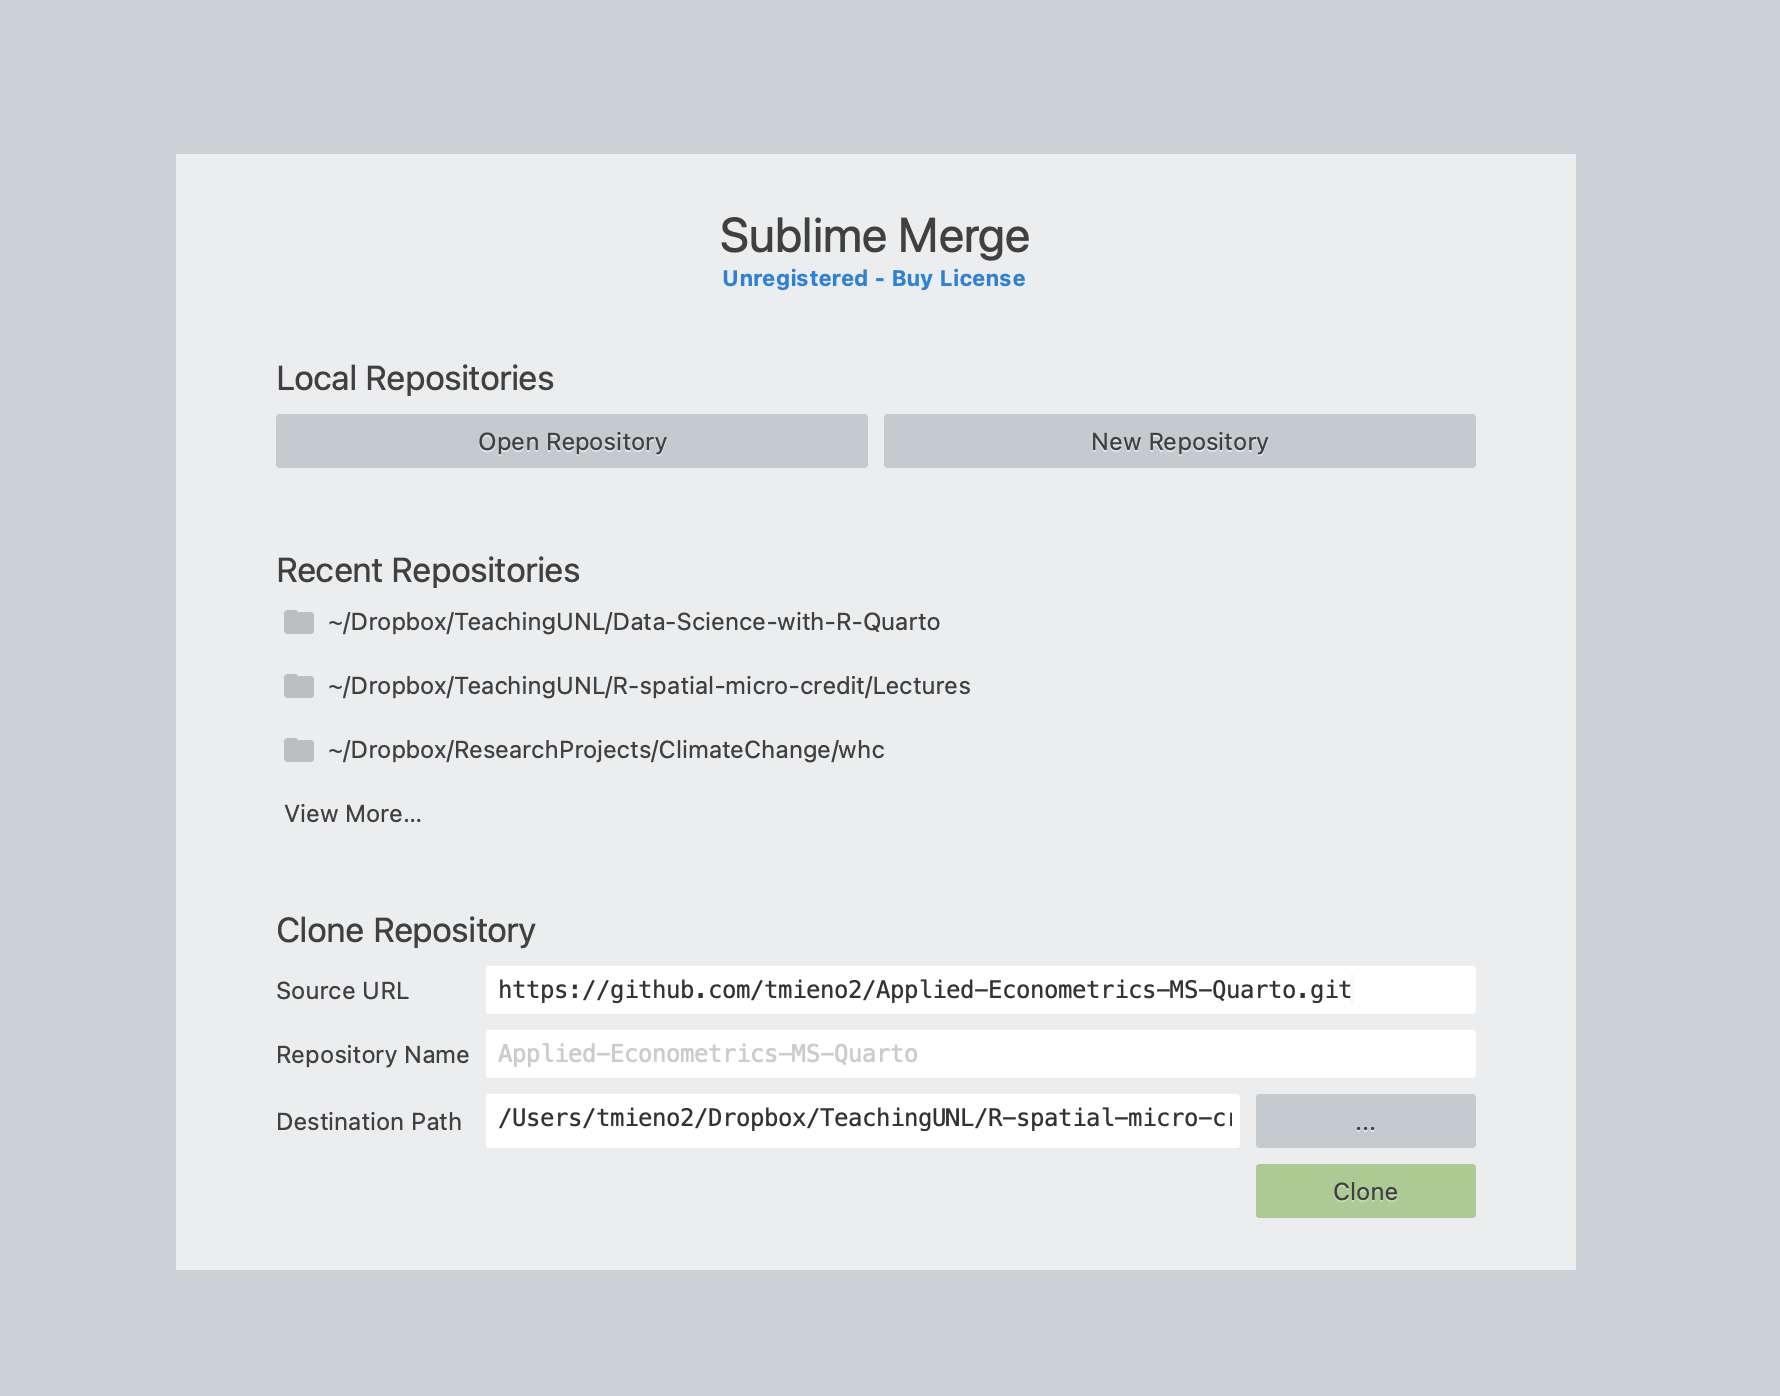
- Note that the source url you copied is already printed on the
Source URLbox (if not, just paste the url yourself). - On
Repository Name, the name of the repository for which you copied the url is printed automatically. If you would like a different name, type the name you want. - On
Destination Path, click on the gray box with...to select the folder on your machine in which the repository is going to be cloned. - Finally, hit the
Clonebutton
Sublime Merge opens the cloned repository once it finishes, which tells you the copy succeeded but not where it went.
- Go to the
Destination Pathyou chose in Step 2, using Finder on a Mac or File Explorer on Windows - You should see a new folder there, named whatever appeared in the
Repository Namebox - Open it, and confirm that the files you saw on the Github page are inside
Transcript
Now you do it yourself. We are going to clone a repository I put together holding the templates and sample files this course uses, and the link is on the slide. Here is the important instruction, and it is bold for a reason: do not delete this folder after you clone it. The rest of Chapter 2 works out of it. The sample qmd that lecture 02-1 walks through chunk by chunk lives in there, there is an example style file, templates/custom.scss, of the sort you will write for yourself in 02-2, and the datasets for the later exercises are in there too. So clone it, and write down where you put it, because the very next lecture asks you to open a file from it.
Let’s clone a repository that has many templates and sample qmd files used in this course.
The repository is found here.
Do not delete it after you clone it. The rest of Chapter 2 works out of this folder:
templates/sample_qmd.qmdis the file lecture 02-1 walks through, chunk by chunktemplates/custom.scssis an example style file to look at when you write your own in 02-2data/holds the datasets used in the later exercises